
PrControl Available Functions
An overview of the available functions you can use from your controller. The functions can be divided into functions you can assign to buttons and functions you can assign to a control like a sliding fader or rotating knob.
PrControl Button Functions
Button functions are like commands for Premiere Pro or the PrControl plug-in. The functions for PrControl itself let the plug-in do something. For example change the current layer, or open a webpage with assigned functions. The commands for Premiere Pro itself are not fixed, when PrControl starts, it asks Premiere Pro which commands are available. And these functions can then be assigned to buttons. An important advantage is that when a new version of Premiere Pro is released that has new commands, they will be available in PrControl at the same time
PrControl Internal Functions
These functions do something in the PrControl plug-in and do not affect Premiere Pro directly.
No Action
This function instructs PrControl to do nothing when the associated button is pressed. This may seem useless, but you can select this function to disable a button. It is also the default action for a button that has not been configured yet.
Update Controller
Normally the controller is updated automatically. But if you regularly make changes that cannot be detected by PrControl, you can instruct PrControl to update the connected controllers.
View Functions
This function generates a web-page with the current functions of your controller and opens it in your default web-browser. If you have multiple controllers connected, a page for each will be generated and opened. If you have MIDI devices that you do not want to use with PrControl, disable them in the PrControl setup dialog.
Increase Layer
This changes the active layer by adding 1. If the current layer is 1, layer 2 will be selected. If the current layer is 8 then the current layer will loop back to 1 when using this function.
Decrease Layer
This changes the current layer by subtracting 1. For example the active layer can go from 3 to 2. If the currently active layer is 1, using this function will select layer 8.
Select Layer 1-8
Selects a layer directly. If you have a controller with plenty of buttons using these functions can save time switching layers. These functions can also be convenient when use only a few layers. For example if you just use layer 1 and 2, it makes sense to use the Select Layer 1 and Select Layer 2 functions as you cannot select the unused layers.
Increment Fader Bank
Increases the current fader bank. The current fader bank determines which audio channels are linked to the controller. For example with 8 faders per bank, bank 1 controls audio channel 1 to 8 and bank 2 controls audio channel 9 to 16.
Decrement Fader Bank
Decreases the current fader bank.
Reset Control
This is a button function to reset the current function of a target control. For example, if the target control is the first slider on your controller, pressing the reset button will check what the current function is of that slider and set it to its default value. Thus, if the function of the slider changes because you selected a different layer, the reset button will now reset this function. It also works if you assign a different function to the slider. The reset function always checks the current function.
When you assign this function, you get a dialog to choose which control to reset. You choose by moving this control. Note that the reset button and the control to reset must be on the same MIDI controller.
Transport Functions
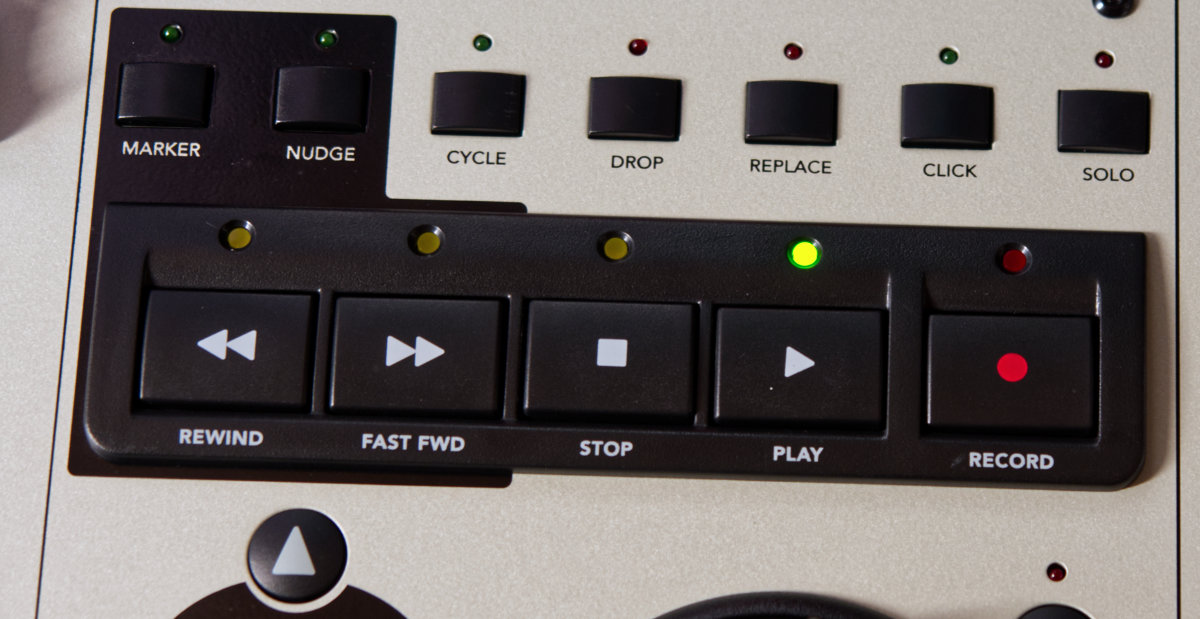
The following transport functions can be assigned to buttons: Rewind, Forward, Stop, Play, Record, Pause, Cycle, Goto Previous, Goto Next, Goto Start. If these functions are assigned to buttons with LEDs, the LEDs will light when the transport function is active.
The function of the Forward and Rewind functions changes with modifiers. When the Marker modifier is active, Forward and Rewind jump to markers. With the Nudge modifier active, Forward and Backward nudge the current clip one frame. With the shift modifier down, they nudge several frames.
Channel State Functions
Record, Solo, Mute and Select. For each audio channel there is a separate channel state function. These functions use the
Channel Component
This function toggles the Channel Component mode on and off. When it is on, the Encoder functions 1 to 8 can be used to control insert effects.
Component Bypass
This function toggles the bypass state of the selected effect on the selected track. If it is on the effect is bypassed, so it is not active.
FaderMax 15dB
This function toggles the maximum volume that can be set using faders. If it is on, the maximum is 15 dB, if it is off the maximum is 10 dB. 10 dB matches the scale on most MIDI controllers. So you can view the approximate volume from the position of the fader.
Toggle Clip Mixer
This toggles the clip mixer on and off. The channel faders now operate on the clip-mixer.
Keyboard Shortcuts
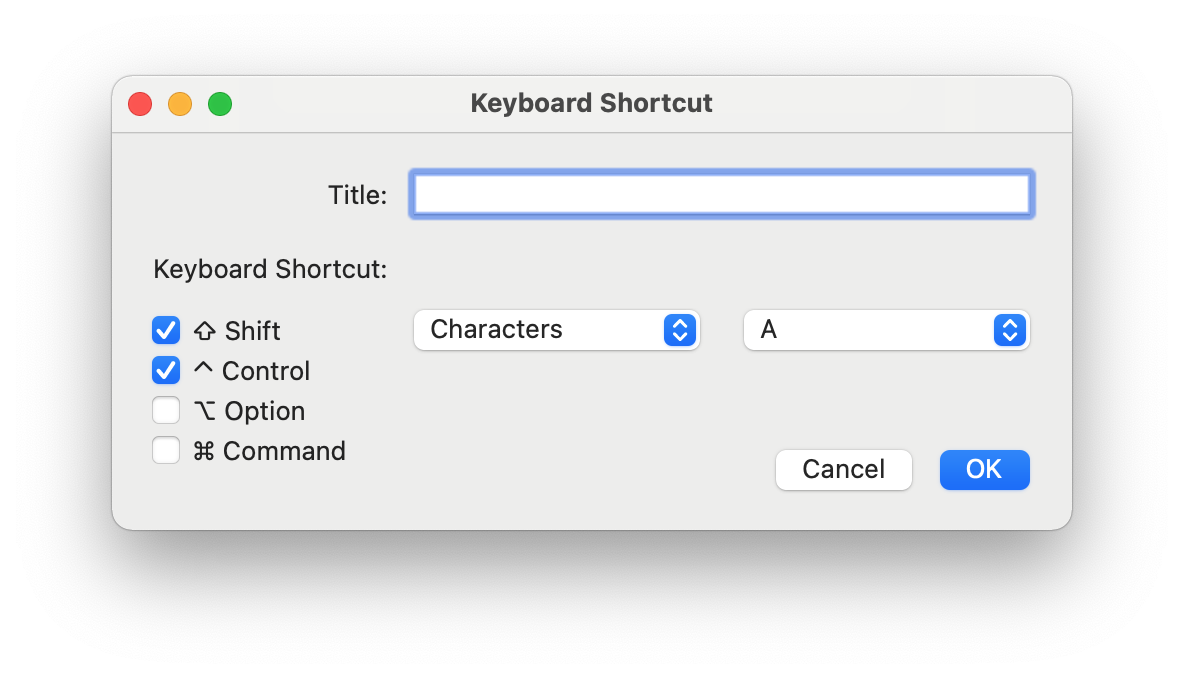
You can use PrControl to send keyboard shortcuts to Premiere Pro from your MIDI controller. When you assign the Custom Keyboard Shortcut function, you will get a dialog where you can define the shortcut. Choose the modifiers and the key.
Shortcuts on the Mac
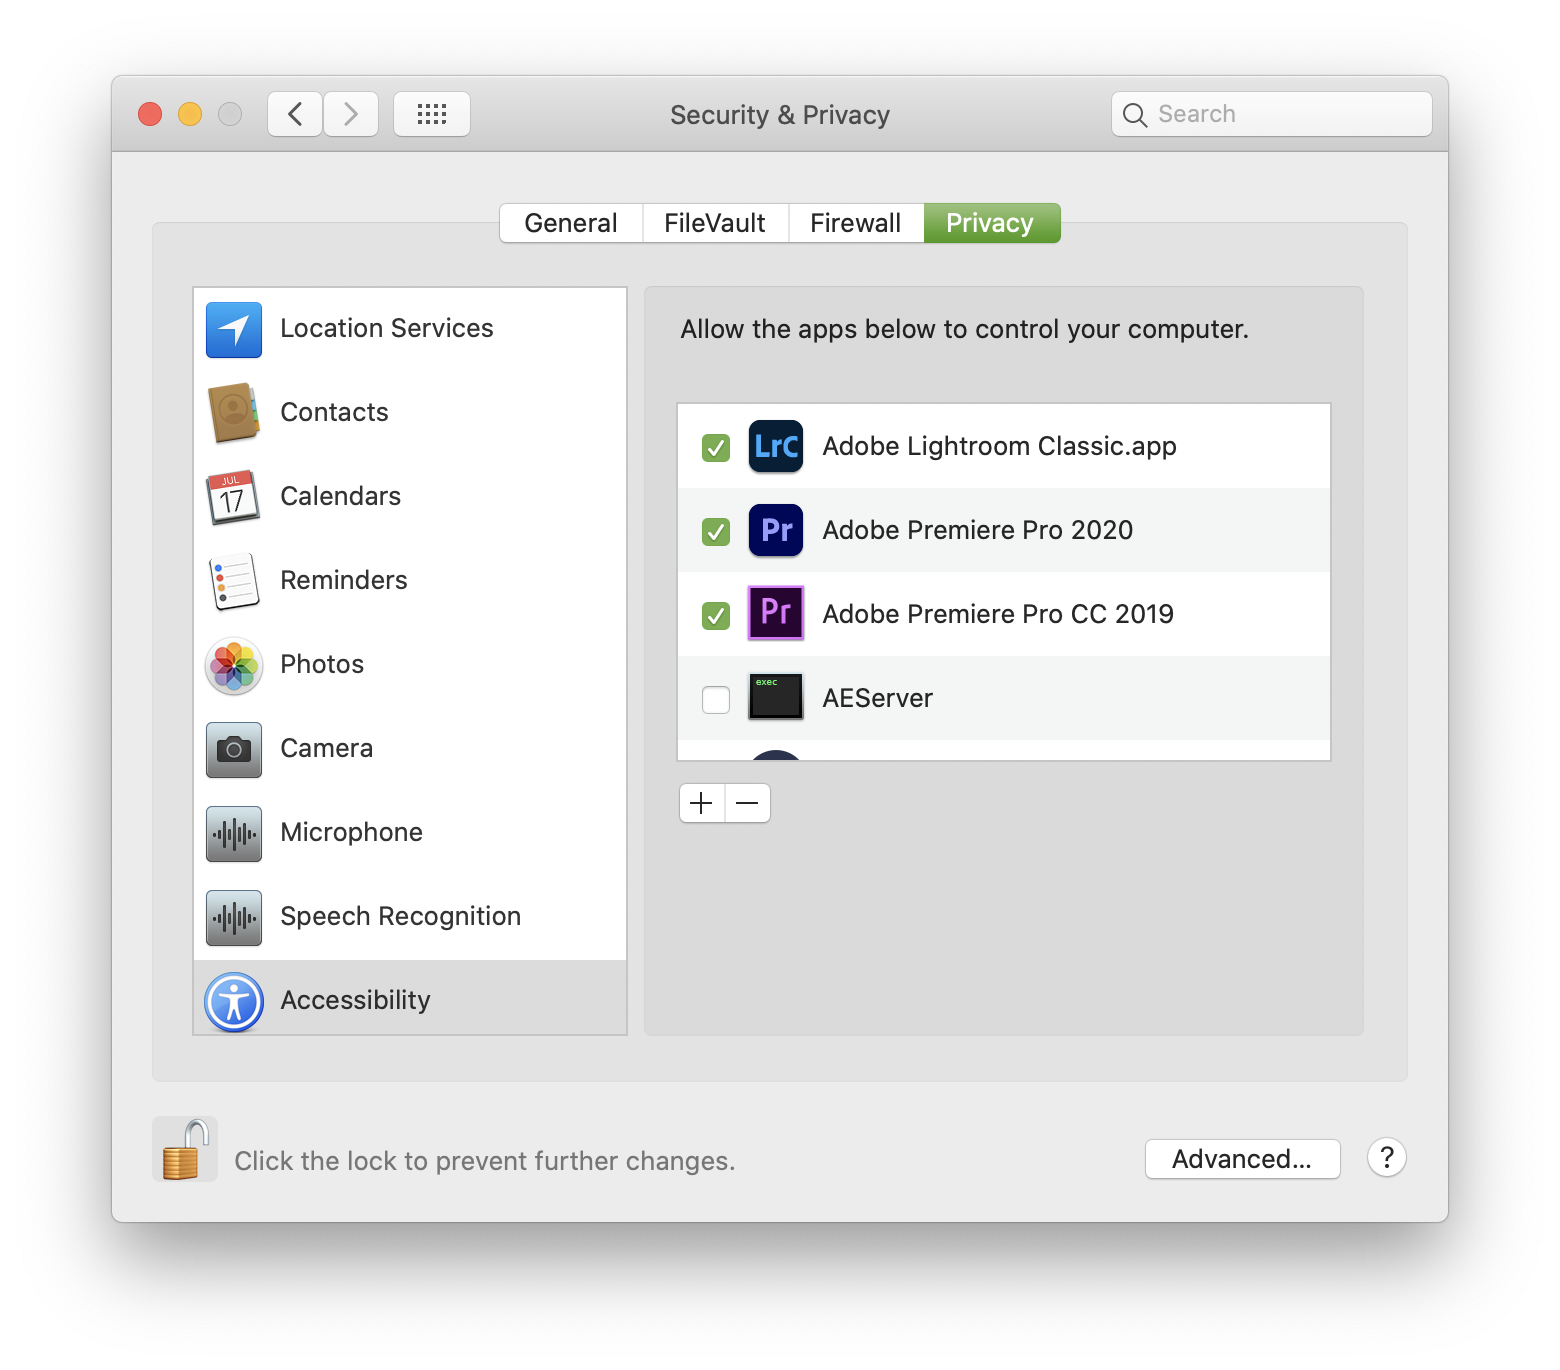
On the Mac using keyboard shortcuts requires the use of accessibility features. These must be enabled from the System Preferences Security & Privacy panel. In this panel, select the Privacy Tab and then Accessibility in the list on the left. Open the padlock and then enable Adobe Premiere Pro on the right in the list of "Allow the apps below to control your computer". Because the PrControl plug-in runs as part of the Premiere Pro application, you have to give this permission to Premiere Pro.
Modifiers
With modifiers, the behavior of specific functions can be modified. The modifiers correspond to the modifiers present on the MCU-Pro and X-Touch controllers. Modifiers only work between connected MIDI controllers in PrControl. Using a modifier affects all active controllers, but it does not affect the keyboard or mouse. And using modifiers on your keyboard does not affect the PrControl plug-in. To use the modifiers, first assign them to a button on your controller. Currently only a few functions work with modifiers, more will be added later.
Shift, Option, Control and Alt.
These modifiers behave like modifier keys found on keyboards, they are active while the button is pressed down.
Shift-Lock, Option-Lock, Control-Lock and Alt-Lock.
These modifiers perform the same function as the regular modifiers, but they toggle the modifier. Pressing Shift-Lock once turns on shift and it stays on until you press it again. You are free to choose what kind of modifiers you like, except for some controllers that do not send a message when you release a button. For example the BCF2000 and BCR2000 cannot work with regular modifiers, you have to use these locking ones.
Marker and Nudge
These are sticky modifiers, they are toggled by pressing the button and they modify the behavior of the Forward and Rewind buttons (See Transport Functions).
Premiere Pro Commands
Premiere Pro accepts a large number of commands. When the PrControl plug-in is starting up, it loads the complete list of available commands from the host application. This list of commands differs between different versions of Premiere Pro, with newer versions having more available commands.
PrControl Control Functions
Using rotating or sliding controls you can set various parameters in Premiere Pro.
Jog
Jog moves the playhead one frame at the time. It works best when assigned to a relative encoder. Some MIDI controllers have a large jog-wheel, ideal for using with jog.
The jog speed can be increased with modifier buttons. While shift is down, the jog wheel jumps by 5 frames at a time. While option is down, the jog wheel jumps by 24 frames at a time. While alt is down, the jog wheel jumps by 30 frames at a time. While control is down, the jog wheel shuttles.
Scrub
Scrub is similar to jog, but when "Play audio while scrubbing" is enabled in the Premiere Pro preferences, you can hear sound while using it. The scrub function cannot transport as well as the jog function. If you move the control very fast, Premiere Pro cannot keep up. Another difference is that the Scrub function depends on the selected panel in Premiere Pro, if the timeline or the program monitor is active it works. But with some panels nothing happens. The Jog function seems to work regardless of the active panel.
The scrub function can also be combined with jog, if the Scrub Toggle button function is on, jog is replaced with scrub. This can be used with controllers that have a scrub button close to the jog wheel.
Shuttle
This function should be assigned to a relative encoder. When you start rotating, the playhead will start moving. The further you rotate the encoder, the faster the playhead will move. You can slow down by turning in the other direction. Use the stop button to stop transport.
Premiere Pro Lumetri
Below is a list of the available lumetri parameters in Premiere Pro 2020.
Lumetri.HDRWhite: HDR WhiteLumetri.Basic.Temperature: TemperatureLumetri.Basic.Tint: TintLumetri.Basic.Exposure: ExposureLumetri.Basic.Contrast: ContrastLumetri.Basic.Highlights: HighlightsLumetri.Basic.Shadows: ShadowsLumetri.Basic.Whites: WhitesLumetri.Basic.Blacks: BlacksLumetri.Basic.HDRSpecular: HDR SpecularLumetri.Basic.Saturation: SaturationLumetri.Creative.Intensity: IntensityLumetri.Creative.FadedFilm: Faded FilmLumetri.Creative.Sharpen: SharpenLumetri.Creative.Vibrance: VibranceLumetri.Creative.Saturation: SaturationLumetri.Creative.ShadowTint.X: Shadow TintLumetri.Creative.ShadowTint.Y: Shadow TintLumetri.Creative.HighlightTint.X: Highlight TintLumetri.Creative.HighlightTint.Y: Highlight TintLumetri.Creative.TintBalance: Tint BalanceLumetri.Curves.HDRRange: HDR RangeLumetri.Wheels.Shadows.X: ShadowsLumetri.Wheels.Shadows.Y: ShadowsLumetri.Wheels.Shadows.Z: ShadowsLumetri.Wheels.Midtones.X: MidtonesLumetri.Wheels.Midtones.Y: MidtonesLumetri.Wheels.Midtones.Z: MidtonesLumetri.Wheels.Highlights.X: HighlightsLumetri.Wheels.Highlights.Y: HighlightsLumetri.Wheels.Highlights.Z: HighlightsLumetri.Wheels.Specular.X: HDR SpecularLumetri.Wheels.Specular.Y: HDR SpecularLumetri.Wheels.Specular.Z: HDR SpecularLumetri.HSLSecondary.Key.HueMiddle: Hue MiddleLumetri.HSLSecondary.Key.HueRange: Hue RangeLumetri.HSLSecondary.Key.HueFalloff: Hue FalloffLumetri.HSLSecondary.Key.SatMiddle: Saturation MiddleLumetri.HSLSecondary.Key.SatRange: Saturation RangeLumetri.HSLSecondary.Key.SatFalloff: Saturation FalloffLumetri.HSLSecondary.Key.LumMiddle: Luma MiddleLumetri.HSLSecondary.Key.LumRange: Luma RangeLumetri.HSLSecondary.Key.LumFalloff: Luma FalloffLumetri.HSLSecondary.Key.Denoise: DenoiseLumetri.HSLSecondary.Key.Blur: BlurLumetri.HSLSecondary.Shadows.X: ShadowsLumetri.HSLSecondary.Shadows.Y: ShadowsLumetri.HSLSecondary.Shadows.Z: ShadowsLumetri.HSLSecondary.Midtones.X: MidtonesLumetri.HSLSecondary.Midtones.Y: MidtonesLumetri.HSLSecondary.Midtones.Z: MidtonesLumetri.HSLSecondary.Highlights.X: HighlightsLumetri.HSLSecondary.Highlights.Y: HighlightsLumetri.HSLSecondary.Highlights.Z: HighlightsLumetri.HSLSecondary.Specular.X: HDR SpecularLumetri.HSLSecondary.Specular.Y: HDR SpecularLumetri.HSLSecondary.Specular.Z: HDR SpecularLumetri.HSLSecondary.Temperature: TemperatureLumetri.HSLSecondary.Tint: TintLumetri.HSLSecondary.Contrast: ContrastLumetri.HSLSecondary.Sharpen: SharpenLumetri.HSLSecondary.Saturation: SaturationLumetri.Vignette.Amount: AmountLumetri.Vignette.Midpoint: MidpointLumetri.Vignette.Roundness: RoundnessLumetri.Vignette.Feather: Feather
Channel Levels
Use a Level Channel function to control the volume of an audio channel. Premiere Pro only responds to channel level input during playback.
Channel Pan
Use a Pan Channel function to control the panning of an audio channel.
Encoder Channel 1-8
When the Channel Component mode is active, these control the parameters for channel effects in the track mixer. When it is off, these control Channel PAN.