
LrControl Guide
On this page you can find more information about getting started and using LrControl.
No Drivers Needed
Note that all supported controllers are USB class compliant, that means no custom drivers required! It also means that you do not have to worry about OS support for the controller. As long as the device is functioning, you can keep using it with an up to date macOS or Windows.
All you need to get started is to install the LrControl plug-in and connect your controller to a USB port on your computer. If you have more than one supported controller, you can use them with LrControl. There is no hard limit, when you use many controllers, response may become a bit slower.
Getting Started with LrControl
Once you have a compatible controller, you can start using LrControl. If you have not installed LrControl yet, start with that.
Installing
Get the installer for your platform from the downloads page. Before starting the installer, quit Lightroom if it was running. After the install is complete, plug in your controller, if you haven't already done so. Then start Lightroom. After Lightroom has started you should see that some buttons on you controller light up. That means LrControl is working.
LrControl Menu Items
You can find the menu items for LrControl in the Lightroom Help Menu, under the Plug-in Extras submenu.

LrControl Menu
- View Controller Functions
- Generates printable reference pages with the controller functions.
- Open Reference Panel
- Opens a panel showing controller functions.
- Open Feedback Panel
- Opens a panel showing parameter feedback as you use the controller.
- Controller Setup
- LrControl preferences, connected controllers and customization.
- Register
- View or enter your license code here.
- Check for Updates...
- Checks if there is a new version of LrControl available on the internet.
- Find MIDI devices
- Scans MIDI if there new MIDI devices (Usually not needed, LrControl detects new devices).
- View Online Guide
- Opens this web-page, which you are viewing now.
- Support
- Opens a dialog with support options, including an option to turn on logging.
Basic Parameters
If the Develop module is not active yet, activate it using the controller. You can find which button to press on the reference panel. It's the "Toggle Develop" function.
Now you can start changing the parameters of the Basic panel in Lightroom. Notice that the first of the layer buttons on your device is lit. That means LrControl is now using the first layer, which controls the Basic panel in Lightroom. Read more about LrControl layers in the next section.
More Lightroom Parameters
The Lightroom controller inputs are mapped in switchable layers, so you can manipulate all develop parameters with the hardware controller. In each layer the function of the sliders and knobs can be different. The function of buttons does not change, it is the same in every layer.
When switching layers, Lightroom automatically shows the corresponding panel. And also when you move a control, the changed parameter is shown in Lightroom.
When you want to go to a different panel, select the appropriate layer. By selecting the next layer you go to the next panel in Lightroom. As some controllers have more controls than others this mapping of layers to panels is not exactly the same for every controller.
Using Knobs and Faders on the Controller

Knobs or Encoders
These are turned clockwise or counter-clockwise. There are different kinds. Some are like a volume knob or a dial, they can be turned a limited amount before they stop and you cannot turn them further. This is at the end of the range of the parameter you are changing.
Another kind is called an endless-encoder, these do not have a stop and they move in small steps. The great advantage of this is that you always start from the current value of a parameter. They are very good for making small adjustments.
Some knobs/encoders have LED lights showing the current value. LrControl sends the Lightroom values to the controller to update these LEDs.
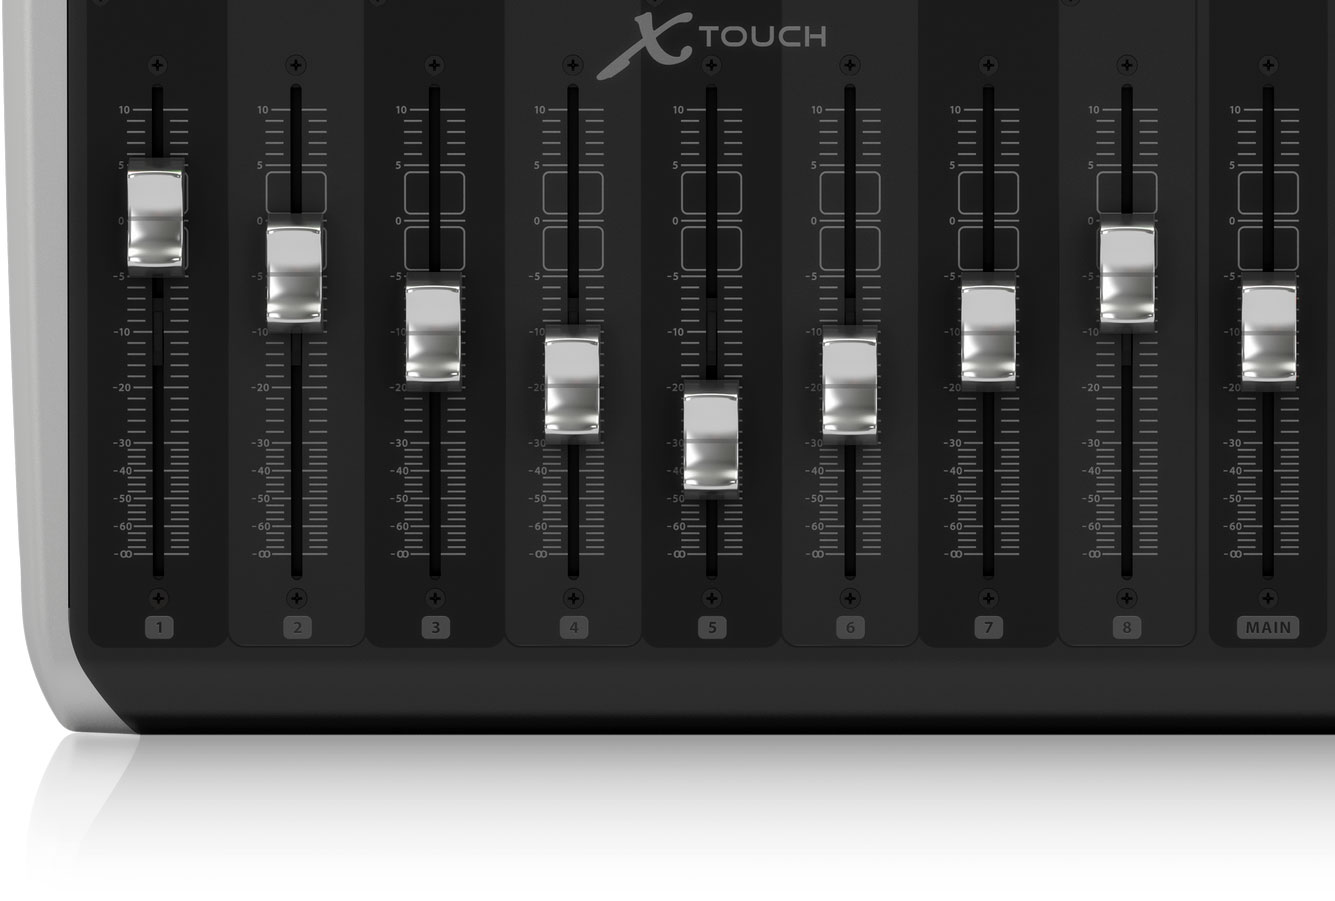
Sliders or Faders
These move up and down and are great for quick and accurate adjustments large and small. They can be motorized. Motorized faders are great, they are automatically adjusted to match the corresponding Lightroom value.
Syncing the Controller
To take advantage of motorized faders and encoders with LED collars, the controller value must match the value in Lightroom. LrControl will automatically keep your controller synced.
Touch Sensitive Faders
Some controllers have touch sensitive faders. For example the Platform-M and X-Touch Compact. LrControl uses this to start/stop tracking in Lightroom, this means that all changes you make between fader touch and release are recorded as a single change in the Lightroom history.
This function for the touch sensitive faders cannot be changed.
Layers and Lightroom Panels
In Lightroom the develop parameters are divided into panels. The functions in the panels are also grouped together in LrControl. Each layer in LrControl, corresponds to a panel in Lightroom. Though sometimes there are extra functions from other panels. At startup LrControl is always in layer 1, which corresponds to the "Basic" panel in Lightroom. To use functions from a different panel, select the corresponding layer in LrControl by pressing one of the layer buttons.

Tool Mode
Using LrControl in Tool Mode. When you activate one of the tools in Lightroom, Lightroom shows you extra controls for tool parameters. These can also be controlled using LrControl. Once Lightroom is in tool mode, you automatically get the functions as shown under the Tool Mode section of your controller page.
When you press one of the layer buttons, the Tool Mode is switched off.
Function Details
Found out more about the available functions in LrControl.
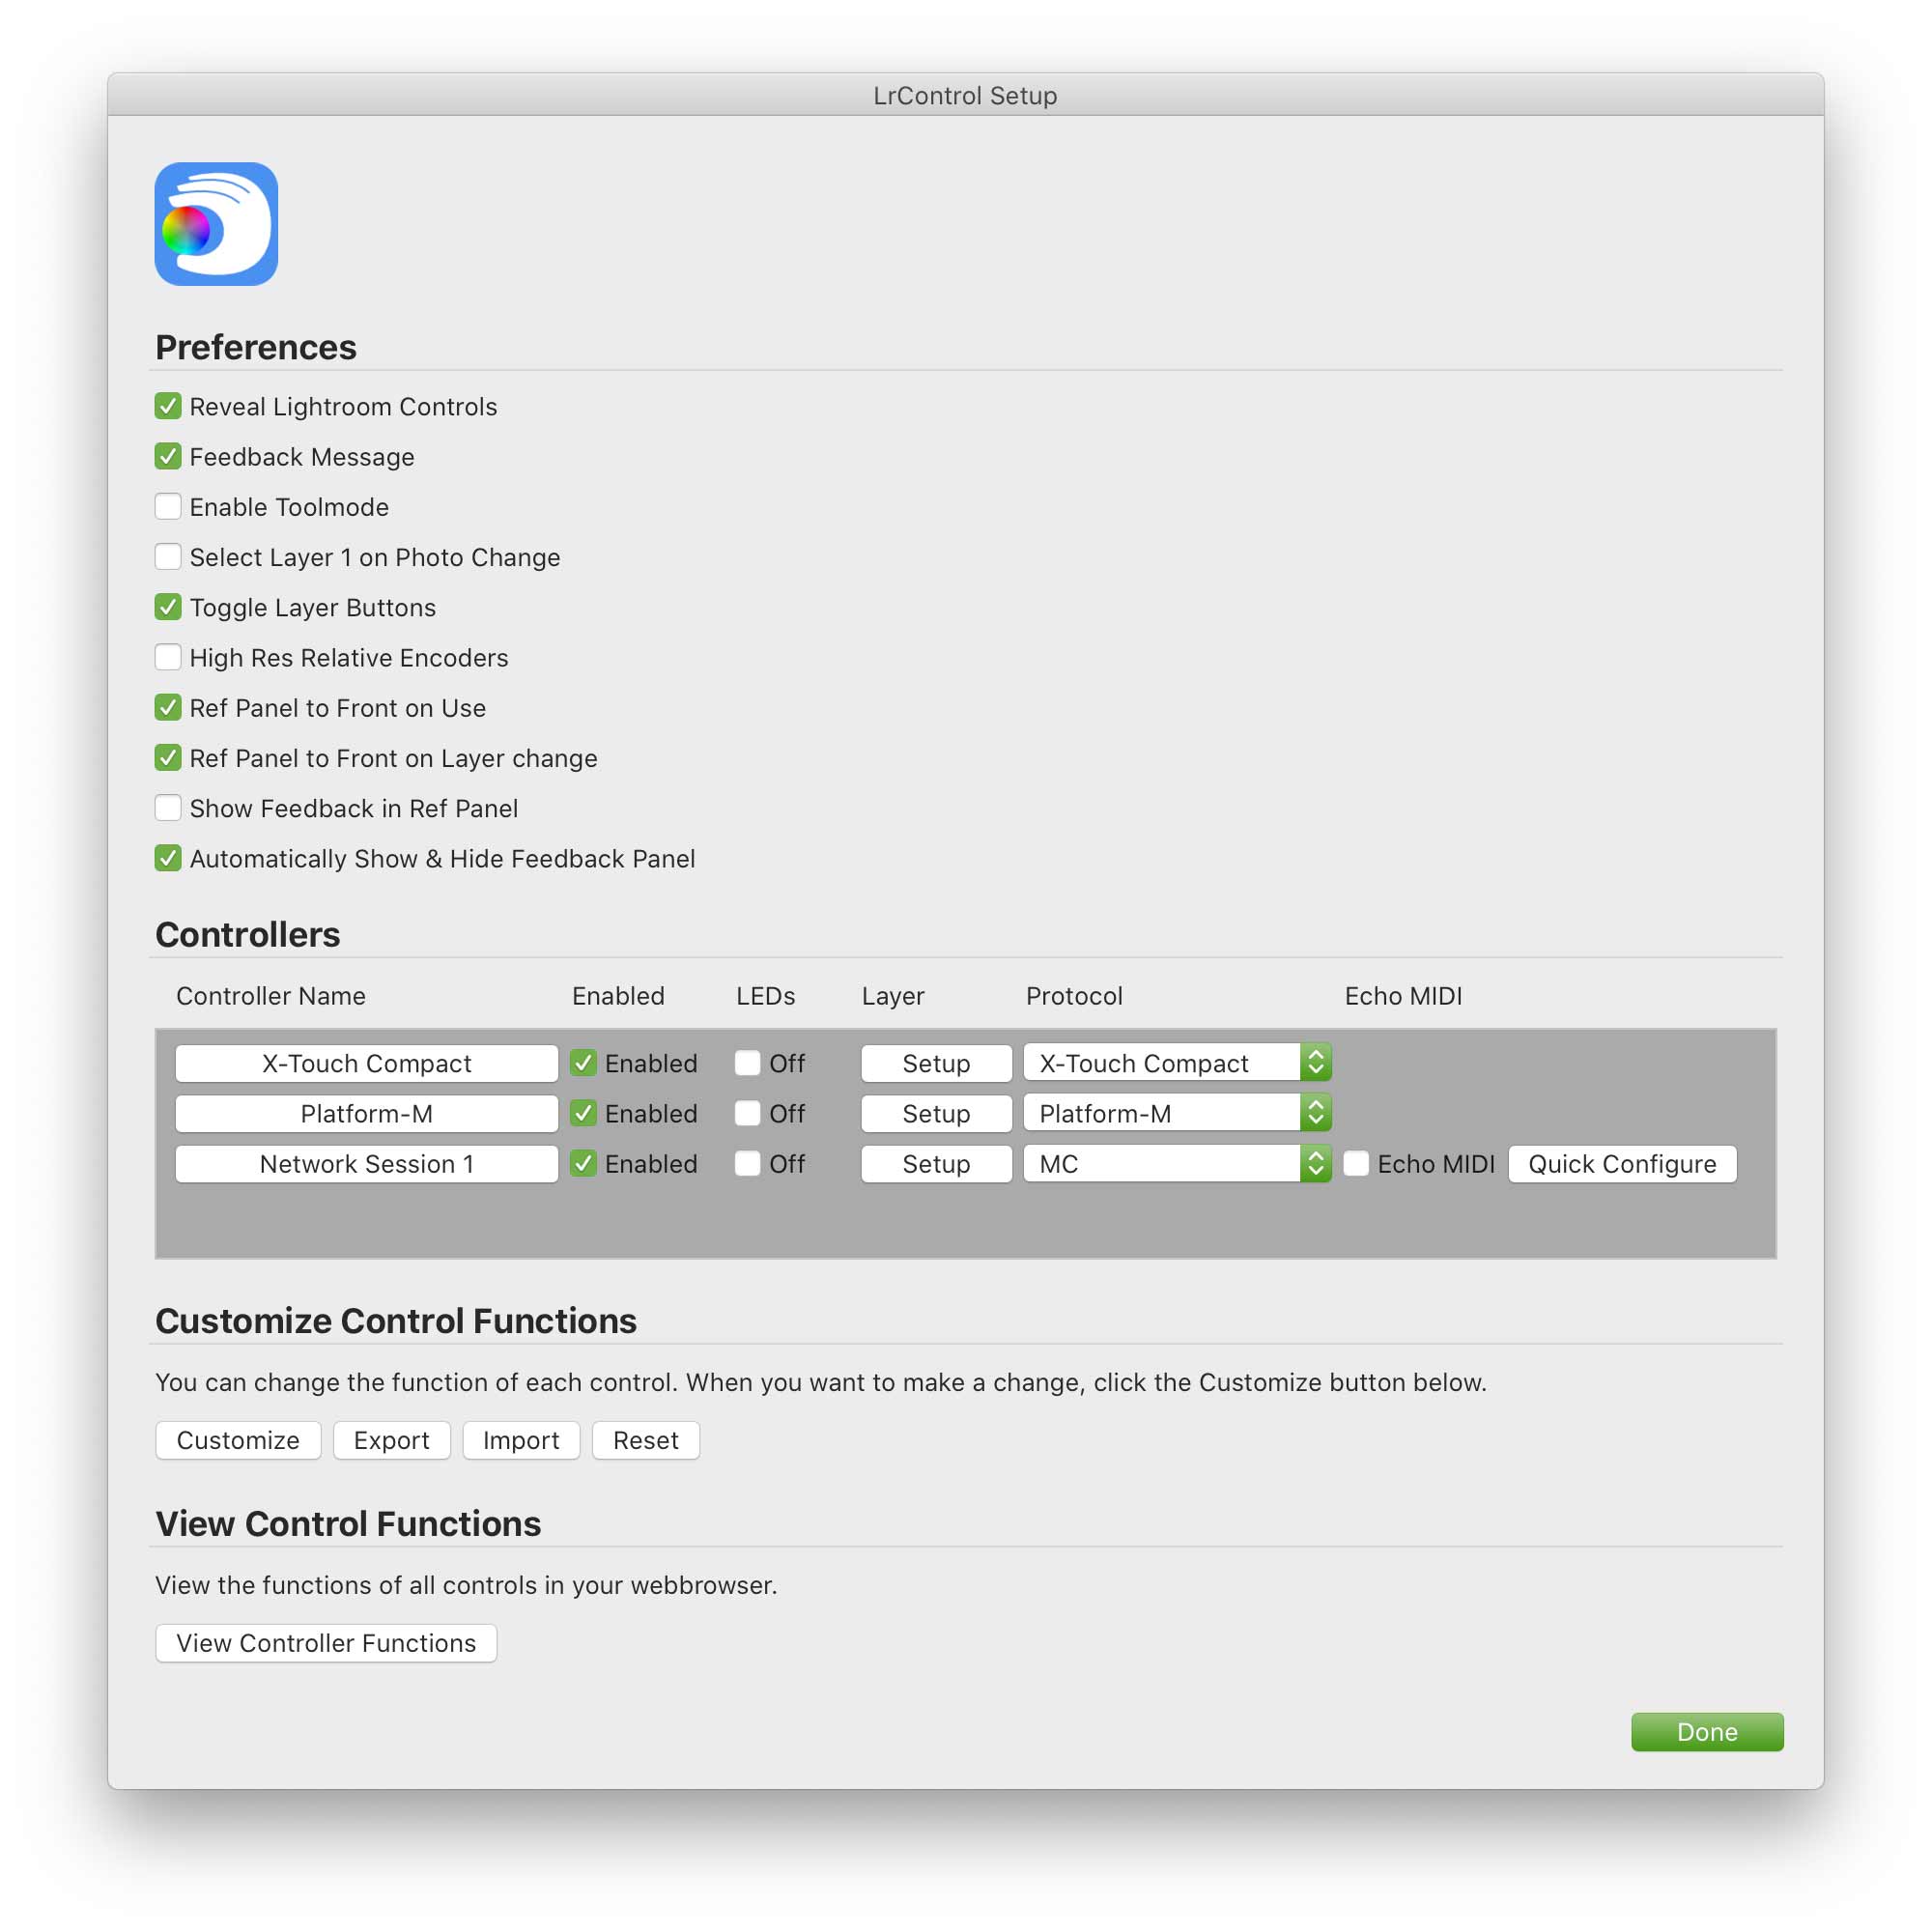
LrControl Setup
There are a couple of optional features you can turn off/on from the Lightroom menu: Help->Plug-in Extras->(LrControl) Controller Setup
Preferences
Reveal Controls
This is on by default. When it is on, Lightroom will reveal the appropriate panel when switching layers in LrControl. And also when you change a parameter through the hardware controller the corresponding software control will be shown in Lightroom. If you want to keep hidden panels hidden, you need to turn Reveal Controls off. For example if you are working on a laptop, you might want to hide all the develop panels so you have more room for your photo.
Feedback Message
When you start using a different parameter or switch layers, a brief message is shown. If you don't want that, turn Feedback Message off. Note that Lightroom itself often shows such feedback messages. For example when changing the flags of a photo. These messages are not affected by this LrControl specific setting.
Enable Tool-Mode
When this is enabled, LrControl will automatically assign tool-mode functions to the controls when a Lightroom tool is active. You can also toggle this preference with a button function, Toggle Tool-Mode.
Select Layer 1 on Photo Change
When you go to a different photo, the next one for example, LrControl switches to Layer 1. This can be very useful if you have a workflow where you start with Layer one and refine the photo with additional LrControl layers. When you are done, you go to the next photo. And LrControl will start over with Layer 1.
Toggle Layer Buttons
When this option is on, you can use layer buttons to switch back and forth between layers. For example, if you have a button to go to layer 4, you go back to layer 1 when you press it again. So you can toggle between layer 1 and layer 4.
High Res Relative Encoders
This will set the increment/decrement of relative encoders as small as possible, which is 1 for most parameters. This option can also be toggled with a button.
Ref Panel to Front on Use
When this is on, the reference panel, if open, will move to the front when you use the controller.
Ref Panel to Front on Layer Change
When this is on, the reference panel, if open, will move to the front when you change layer.
Show Feedback in Ref Panel
Shows parameter feedback in the reference panel.
Automatically Show & Hide Feedback Panel
This should normally be on. But if you want to move the feedback panel, you can turn this off. This checkbox is the same as the "Auto Hide" checkbox in the Feedback Panel.
Controllers
This is a list of the currently detected and supported controllers, with a button to go directly to the online reference page. Also for some controllers there are controller specific functions that can be accessed here.
Layer Setup
This opens a dialog where you can change the name of each layer and choose which Lightroom panel to reveal when the layer is selected.
Send Setup Data
The BCF2000 and BCR2000 controllers can receive a full set of setup data. LrControl can send such a setup to the device that works with LrControl. Useful for when you have lost factory settings. And in case of the BCF2000, it fixes a small bug in the factory settings (encoder 4 & 5 send the same message when pressed).
Enabled
You can disable a controller if needed. LrControl will then ignore messages coming from the controller.
Echo MIDI
Some devices with motorized faders will move the faders back to the old position after moving the faders. With echo MIDI they will remain in the new position.
Protocol
New in 3.0. Devices that are not automatically recognized have an extra option, the protocol. If your device supports the MC Protocol or the MC Extender protocol, select it using the protocol popup. If not, please leave the Generic MIDI option selected. Note that changing the protocol will overwrite any MIDI assignments you may have done earlier.
Note that the MC and MC extender modes are very similar, but make sure to select the appropriate protocol for your controller, some features do not work with the wrong protocol selected.
Customize Control Functions
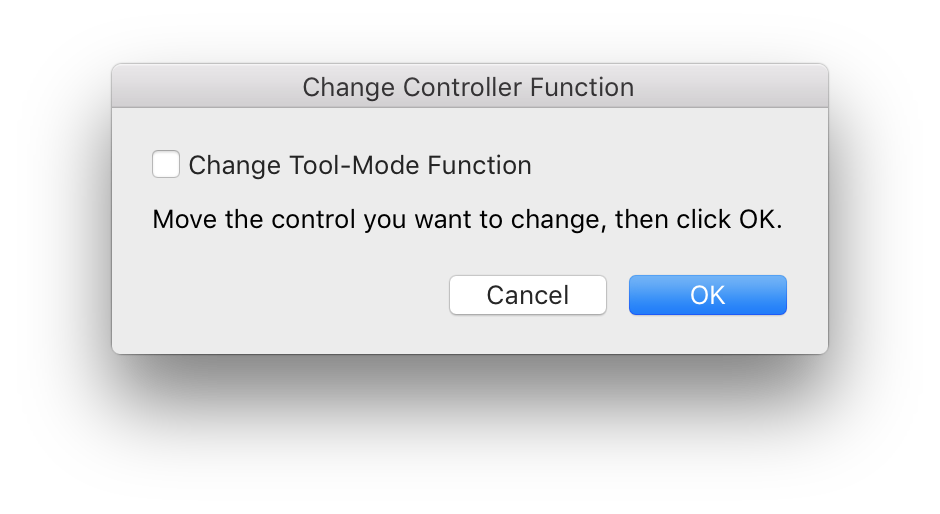
You can customize LrControl by changing what each knob, button or slider does. You customize by first choosing the control, so the knob, button or slider, then you pick a function for that control.
Almost every controller function can be changed. But be careful when changing layer buttons, make sure you can still access the layers you need.
If you want to customize the function in tool-mode, check the box in de dialog above. This only works for faders, knobs and encoders. If you select a button, the tool-mode checkbox is ignored.
The import and export buttons can be used to backup and share your customizations. Only the changes you make are saved, so it is possible to import settings for a different controller without loosing your own changes. The export function is also great if you want to move your changes to another computer, like your laptop for example.
The import function will apply the changes in the file you load to your current configuration. Only the changes in the file are applied, so you will get merged result. If you want to replace your configuration, or go back to an earlier export, do a reset first.
The reset function restores the default control functions.
Pushable encoders: If you want to modify the function of pushing down an encoder, try to avoid rotating the knob while pushing down. Otherwise you will get a list of functions to assign to the turning action instead. If this happens, just cancel and try again.
iCON iControls Pro: This device has little buttons on top of the sliders. When you want to customize a slider, keep the button pressed while clicking OK to select the control.
View Control Functions
Generates a printable page with all your controller functions in your web-browser. The page has separate styling for print so all the layers will print.
If you just want to view your controller functions, try the reference panel.
MC Mode
A great advantage of the MC mode is that the controls use the same MIDI messages. This makes it possible to apply the same configuration for all controllers that support this MC mode.

Display
The build-in display is used to display the current function of faders and encoders. This information is updated automatically when you switch layers or assign a new function to one of the controls. Note that there is only limited space to display the functions, therefore the names of the functions are automatically shortened to fit.
The segmented display on the right is used to display some meta-data of the currently selected photo in Lightroom. From left to right it shows the aperture, shutter-speed and iso value. Note that if both the shutter-speed and iso value take up too much space, the iso value is not displayed.
Exposure
The segmented display on the right is used to display some meta-data of the currently selected photo in Lightroom. From left to right it shows the aperture, shutter-speed and iso value. Note that if both the shutter-speed and iso value take up too much space, the iso value is not displayed.
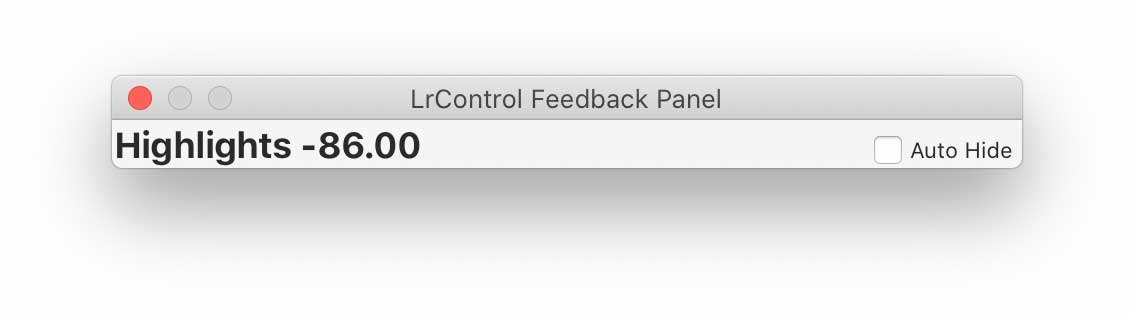
Feedback Panel
The feedback panel shows you the last thing you did with LrControl. When you press a button, the function that was send to Lightroom appears here. And if you are developing a photo, you see the last develop parameter and the value that was send to Lightroom. What you see updates continuously while you are moving a control.
You can open the feedback panel from the menu (Help>Plug-in Extras>LrControl:Open Reference Panel). You can also assign opening the feedback panel to a button. The function is the General section when you pick a button function to assign.
Auto Hide
The feedback window is automatically hidden so it does not interfere with other functions. But the auto hide option makes it very difficult to move the window. To position it, use the controller so it appears, uncheck "Auto Hide" and put the window where you like. Then enable it again. Keeping Auto Hide off will prevent some functions from working. That is because some functions work by sending keyboard strokes to Lightroom and these go to the Feedback panel if it is visible!
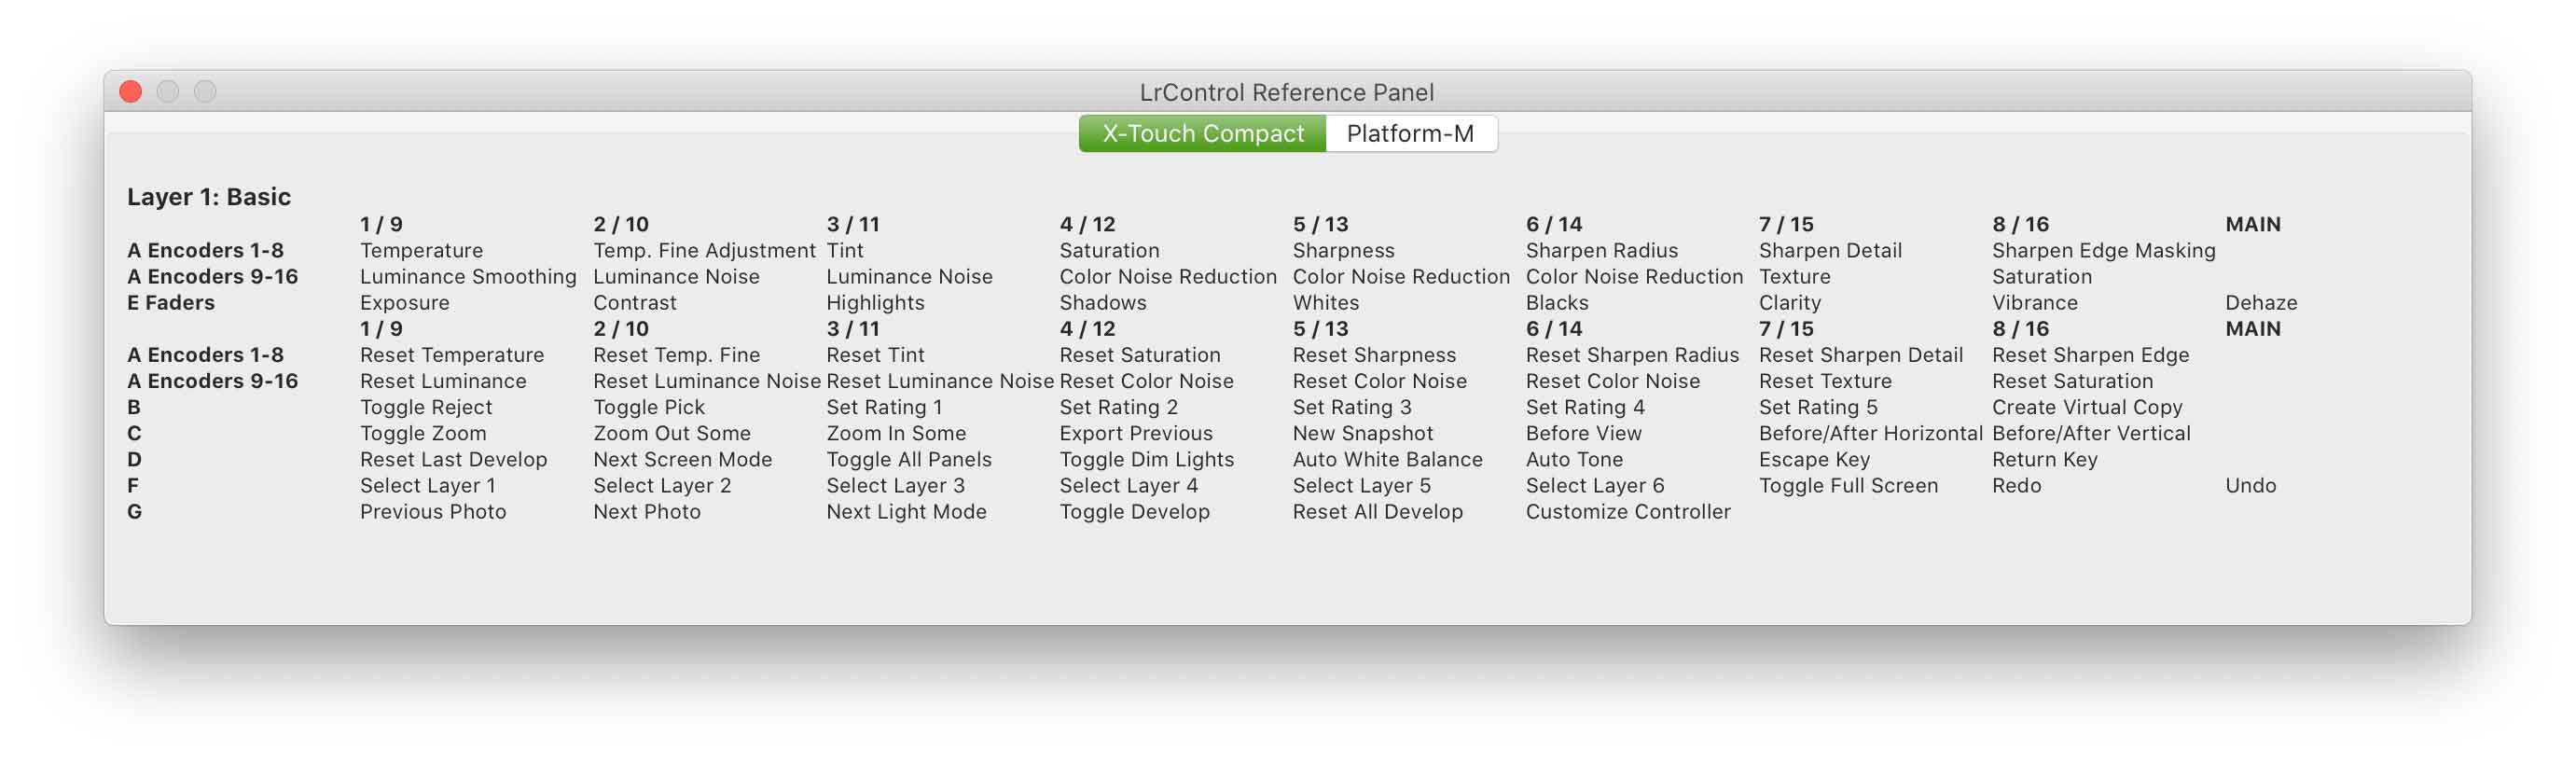
Reference Panel
The reference panel shows you the current function of all the controls on your controller. This overview updates automatically when you change layers. When you assign new functions, it is a good idea to open the reference panel, so you can see which controls are still unused. The reference panel updates automatically as you assign new functions.
The reference panel only works with recommended controllers and MC-mode compatible controllers. For other controllers the layout of the controller is unknown, so the reference panel is not very useful.
You can open the reference panel from the menu (Help>Plug-in Extras>LrControl:Open Reference Panel). You can also assign opening the reference panel to a button. The function is the General section when you pick a button function to assign.
If you have both the Feedback Panel and the Reference Panel open, you can get some screen flicker. if you want to see both, it's better to use the option to view feedback in the reference panel.
Reference Panel Options
In the LrControl setup dialog, you can find some new options for the Reference Panel. You can choose when to bring it to the foreground. And you can choose if you want to see the LrControl feedback.
Customize LrControl to your Workflow
Lightroom is so versatile and has so many functions that you use it in your own unique way. That is why you probably want to customize LrControl to fit your workflow. Here are some tips to make it easier.
Customize with a Button
If you plan to change the function of more than a few buttons and controls, it is worthwhile to have a button to bring up the customization dialog. The function is called "Customize Controller" in the "General" category. So first assign this function to a button from the setup dialog. And then you can customize any time with this button.
Use the Reference Panel
The reference panel (see above) always shows the current controller functions. It updates automatically when you make a change. So it is a good idea to keep this panel open while customizing your controller.
Support
Any problems that are found in LrControl are fixed quickly. So if you find something unexpected, please send an email.